The secret to breathtaking Delta reflection photography isn’t eliminating glare, but artistically controlling it to paint with light.
- Mastering a Circular Polarizer (CPL) allows you to choose between a perfect mirror or a view into the clear water below.
- Golden hour light, combined with specific exposure settings, can create dramatic silhouettes or delicate rim-lit subjects.
Recommendation: Treat the water as a dynamic canvas, using deliberate focus and exposure choices to transform your images from simple records into fine art.
To stand at the edge of an Okavango floodplain as the sun sets is to witness a liquid sky. The water becomes a perfect, dark mirror, holding the fiery colours of dusk. For a landscape photographer, this is the ultimate canvas. Yet, capturing this magic is a profound technical challenge. The very light that creates the beauty also produces frustrating glare, turning a potential masterpiece into a flat, washed-out image. Many guides offer simple advice: use a polarizing filter, or shoot during the golden hour. While correct, this advice barely scratches the surface.
This approach treats the reflection as a static problem to be solved. But what if the true art lies not in eliminating imperfections, but in consciously sculpting them? The key to moving from a competent photographer to a fine art photographer in the Delta is to stop fighting the light and start conducting it. It requires understanding that the water’s surface is a dynamic element, a choice between a flawless mirror and a luminous window into the clear world beneath. It’s about intentionality in every decision, from the precise rotation of your filter to the exact point of focus within the reflection itself.
This guide reframes the challenge. We will not simply list tools; we will explore an artistic workflow. We will delve into the rhythm of the Delta’s light, the techniques to control your ‘dynamic canvas,’ and the strategies to capture not just a reflection, but the soul of this aquatic wonderland. Prepare to transform your approach and create images with unparalleled depth and emotion.
To fully master this artistic approach, this guide breaks down the essential elements you need to control. From understanding the natural rhythms of the Delta to the specific technical settings for your gear, the following sections provide a complete roadmap for capturing extraordinary reflections.
Summary: A Photographer’s Guide to the Delta’s Liquid Mirror
- Why Do Water Lilies Open and Close at Specific Times of Day?
- How to Spot Malachite Kingfishers Hiding in the Papyrus?
- Golden Hour on the Water: How to Expose for Silhouettes and Sun?
- Why Is the Okavango Water So Clear Despite Being a Swamp?
- When Is the Water Level Highest for the Best Landscape Scenery?
- How to Photograph Birds in Flight from a Moving Boat?
- How to Capture the Mirror Effect on the Floodplains at Sunset?
- Helicopter vs. Fixed Wing: Which Offers the Best Scenic Flight Over the Delta?
Why Do Water Lilies Open and Close at Specific Times of Day?
The Okavango Delta operates on a rhythm dictated by light and water. Understanding this rhythm is the first step toward creating authentic images. The water lilies, dotting the floodplains like stars, are a perfect example. They are not static decorations; they are active participants in the daily cycle. Their behaviour offers a powerful lesson in timing for any photographer. These flowers follow a strict circadian clock, a natural timer that an artist can use to their advantage.
Scientific observation confirms this precise schedule. Research shows that water lilies open within 30 minutes at 8:00 AM and maintain their maximum opening angle until 16:30. This isn’t just a biological curiosity; it’s a creative cue. It tells you that the best time to capture these flowers in their full glory, perfectly reflected in the morning or late afternoon water, is within this specific window. Shooting outside these hours might yield images of closed buds, telling a different, more subdued story.
This precision demonstrates a core principle of Delta photography: the landscape is alive and predictable. By learning these patterns—from the opening of a flower to the movement of animals—you can anticipate moments of peak beauty. Your role is to be present and prepared when the Delta’s natural artistry reveals itself, aligning your shutter with the pulse of the environment. This photographic timing is as crucial as any technical setting on your camera.
How to Spot Malachite Kingfishers Hiding in the Papyrus?
While grand landscapes define the Delta, its soul is often found in the details. The malachite kingfisher, a flash of turquoise and orange, is one of the Delta’s most coveted subjects. Finding and photographing this jewel-like bird among the dense papyrus reeds requires more than luck; it demands a specific strategy of observation and anticipation, perfectly suited for the low-angle perspective of a traditional mokoro.
The key is to think like a predator and an artist simultaneously. Expert guides don’t just search for the bird itself; they identify photogenic perches—a gracefully arching papyrus stem, a sunlit branch over the water—and wait. This allows for critical pre-visualization and technical preparation. An eye-level perspective from a mokoro is ideal, placing you on the same plane as your subject and enabling intimate, engaging compositions. This low angle transforms the water’s surface into a beautiful foreground or a source of reflected light.
As the case study on Okavango photography notes, this strategy allows for pre-focusing techniques that are essential for capturing a sharp image of a fleeting subject. By having your focus set on the perch, you are ready for the moment the kingfisher lands. The diverse habitats mean these moments can happen anywhere, with kingfishers often found alongside bee-eaters, egrets, and jacanas. The challenge is to isolate your subject against a clean, non-distracting background, using a wide aperture to melt the surrounding reeds into a painterly bokeh.
Golden Hour on the Water: How to Expose for Silhouettes and Sun?
The golden hour in the Okavango Delta is not like anywhere else on Earth. The light is softer, the colours are deeper, and the water itself becomes an active part of your palette. A noted photographer who has spent extensive time in the region captured this sentiment perfectly.
The clear, tannin-stained water of the Delta interacts with golden hour light to create unique, deep coppery and amber reflections not found elsewhere.
– Jon McCormack, Photographing Okavango’s Wet Season
This unique interaction means you must make deliberate artistic choices with your exposure. You are not just recording the scene; you are interpreting it. Do you want a dramatic, stark silhouette of an elephant against a fiery sky? Or do you prefer to capture the delicate, golden rim light that traces its form? Each choice requires a different technical approach. Your camera’s light meter will often be fooled by the bright sky, so manual control is paramount.
The following settings provide a starting point for achieving specific artistic effects. These are not rigid rules, but a framework for your creative decisions, allowing you to sculpt the incredible light of the Delta’s golden hour.
| Shooting Scenario | Camera Settings | Expected Result |
|---|---|---|
| Perfect Silhouette | Expose for sky, f/8, 1/500s, ISO 100 | Black subject outline against golden sky |
| Rim Light Effect | Underexpose by 1 stop, f/5.6, 1/250s | Bright edge definition on subject |
| Sun Star on Water | f/11-f/16, 1/125s, partially obscure sun | Sharp light rays reflecting on water |
| Bracketed HDR | 3 shots: -2/0/+2 EV, f/8 | Full dynamic range capture |
Mastering these techniques transforms you from a passive observer into an active artist. By bracketing your exposures or intentionally underexposing, you can control the mood and drama of the final image, deciding exactly how much detail to reveal or conceal in the shadows. The reflection becomes a character in your story, not just a byproduct of the landscape.
Why Is the Okavango Water So Clear Despite Being a Swamp?
One of the great paradoxes of the Okavango is the startling clarity of its water. Unlike a typical swamp, the Delta’s water is filtered by immense sand beds as it flows from the Angolan highlands. This natural filtration process, combined with the papyrus roots absorbing impurities, results in a gin-clear quality that presents a unique opportunity for photographers. You have a choice: capture the perfect mirror on the surface or reveal the submerged world beneath. The tool that gives you this creative control is the Circular Polarizer (CPL) filter.
A CPL filter works by cutting down reflected, polarized light. In the context of the Delta, this means you can either enhance the mirror-like reflection or virtually eliminate it to see through the water. This is not an on/off switch but a dial of creative control. Rotating the filter allows you to « tune » the reflection to your exact artistic taste, making it the single most important accessory for water photography here. Mastering its use is non-negotiable for anyone serious about capturing the Delta’s dual nature.
Using a CPL isn’t as simple as just screwing it on. It requires a methodical approach to achieve the desired effect, turning a technical tool into an artistic instrument. This process allows you to decide, shot by shot, whether the story is on the surface or beneath it.
Your Action Plan: Mastering the CPL Filter for Water Reflections
- Dial in the effect: Start by rotating the CPL to its maximum polarization (typically at a 90° angle to the sun) to see through the water surface and assess underwater details.
- Balance the composition: Dial the polarization back to around 50% to find the perfect balance between surface reflection and underwater transparency, creating layers of depth.
- Ensure sharpness: Use a mid-range aperture like f/5.6-f/8 for optimal sharpness when your goal is to capture details through the water.
- Find the best angle: Position yourself at a 30-45° angle to the water’s surface, as this is where a CPL has its most dramatic effect.
- Make a creative choice: Consciously switch between full polarization for clear underwater shots and minimal or no polarization for powerful, pure mirror reflections.
Remember that a CPL filter inherently reduces the amount of light reaching your sensor. High-quality filters are designed to maximize light transmission, but you will always need to compensate by either increasing your ISO or using a slower shutter speed. This trade-off is a small price to pay for the immense creative power it unlocks, allowing you to treat the water as a fully controllable dynamic canvas.
When Is the Water Level Highest for the Best Landscape Scenery?
The Okavango Delta is a landscape in constant flux, defined by the annual flood pulse that travels from the Angolan highlands. It’s a slow, deliberate process, as the rains from Angola can take up to six months to meander their way down and fill the floodplains. The timing of your visit determines the very nature of the landscape you will photograph. Each season offers a distinct aesthetic and presents a different set of opportunities and challenges.
The peak of the seasonal floods occurs from May through August. During this time, the Delta transforms into a lush, green water world. This is the ideal period for capturing those iconic images of vast, serene floodplains and creating minimalist compositions with lone trees reflected in seemingly endless water. However, the abundance of water means wildlife is more dispersed and can be harder to find.
Conversely, the dry season, particularly from September to early November, presents a different kind of beauty. As the floodwaters recede, the vegetation becomes less green, but the wildlife concentrates around the remaining water sources. This is considered the optimal time for concentrated wildlife photography, as animals gather in predictable locations. The trade-off is a hotter, dustier environment, with temperatures that can soar into the 40s Celsius. The « best » time is therefore not an absolute, but a choice based on your artistic priorities: do you seek the verdant, watery landscapes of the flood season or the intense wildlife encounters of the dry season?
How to Photograph Birds in Flight from a Moving Boat?
Capturing a sharp image of a bird in flight is challenging enough on solid ground. From the gentle sway of a mokoro or the hum of a motorboat, it becomes an exercise in stability, anticipation, and communication. The boat’s movement introduces instability that can easily ruin a shot, but with the right technique, you can turn this platform into a mobile hide that gets you incredibly close to the action.
The first principle is to create a stable core. You cannot rely on a tripod, so your body must become one. Bracing your elbows on your knees while seated low in the boat provides a surprisingly solid base. This physical technique must be paired with specific camera settings designed for motion. Using back-button focus decouples the act of focusing from releasing the shutter, allowing you to track a bird continuously without the camera trying to re-focus every time you press the shutter button. Combined with a fast shutter speed (minimum 1/1000s for flying birds) and Auto ISO, you create a system that is responsive and forgiving.
However, technical skill is only half the battle. Your guide is your most valuable asset, and clear communication is essential. Many guides are accustomed to tourists with smartphones and may try to get as close as possible. As one expert guide points out, this can be counterproductive for a photographer with a long lens.
I have actually had to ask my guide to back away from subjects as we have drifted too close. Many guides are used to people with smartphones, so there is a tendency to go much closer than necessary.
– Nature TTL Photography Guide, How to Plan a Photography Trip to the Okavango Delta
Brief your guide on your desired shooting distance before you even set off. For better stability, especially for bird photography, consider a motorized flat-bottom boat over a traditional mokoro, as they provide a much steadier platform. With the right combination of physical stability, camera settings, and clear communication, you can capture stunning, dynamic images of the Delta’s birdlife from the unique perspective of the water.
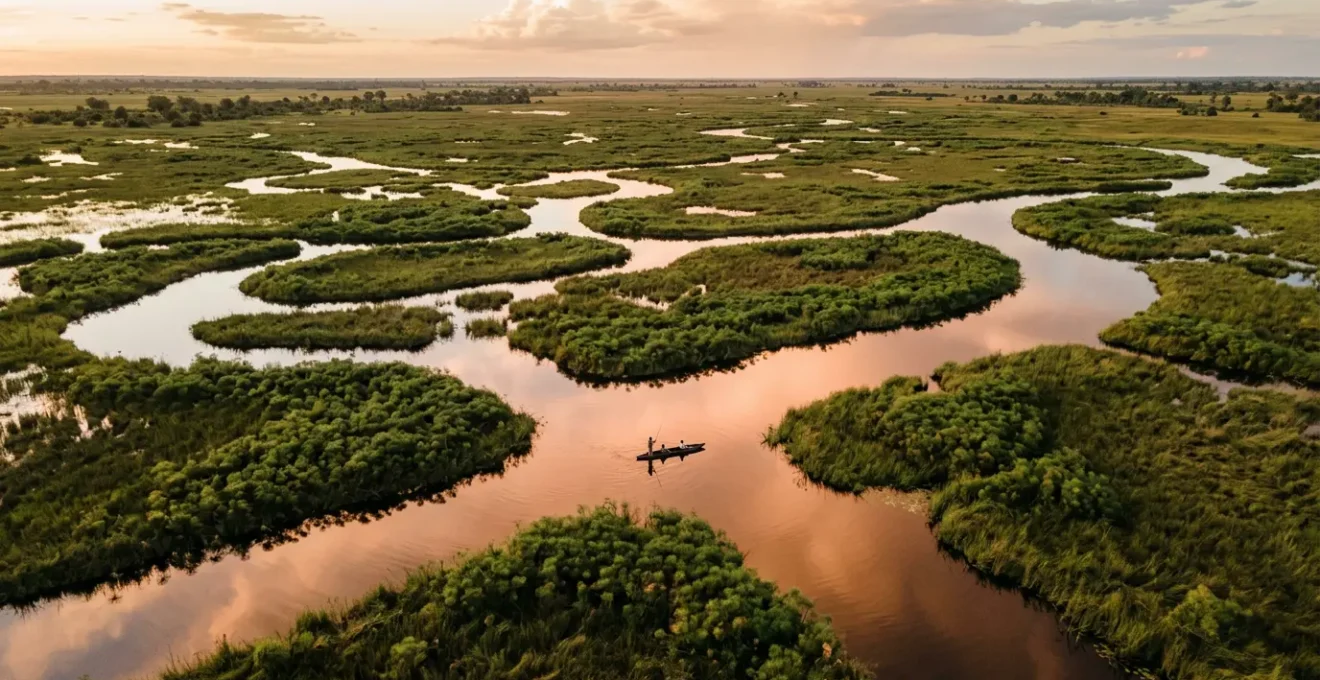
How to Capture the Mirror Effect on the Floodplains at Sunset?
When conditions are perfect—still air, clear water, and golden light—the Delta’s floodplains transform into a flawless mirror. Capturing this effect is about more than just pointing your camera at the scene; it’s about making a crucial artistic decision with your point of focus. Where you choose to focus dictates the entire feel of the image, determining whether you create a literal record or a more impressionistic, painterly interpretation.
As one photographer discovered during the wet season, even when animals were harder to find, the opportunities for reflection photography were extraordinary. By patiently waiting and pre-visualizing the shot, he was able to capture stunning images of red lechwe leaping across water channels, achieving both a sharp subject and a perfect, liquid reflection. This success hinges on understanding your focusing options. Do you prioritize the sharpness of the subject, or the overall sharpness of the entire scene, including the reflection?
Your choice of focus point is a powerful creative tool. There is no single « correct » method; each one serves a different artistic purpose. The key is to be intentional with your choice, understanding the outcome each technique will produce.
| Focus Method | Technique | Result | Best Use Case |
|---|---|---|---|
| Subject Focus | Focus directly on main subject | Sharp subject, soft reflection | When subject detail is priority |
| Hyperfocal Reflection | Focus 1/3 into the reflection | Balanced sharpness throughout | Overall scene sharpness |
| Painterly Effect | Slight defocus with ripples | Impressionistic, abstract | Artistic interpretation |
| CPL Rotation | Dial polarization 0-100% | Control reflection intensity | Creative control of mirror effect |
Using these strategies, you can decide whether to render the scene with crisp, documentary-style clarity or with a soft, ethereal quality. For example, focusing on the subject itself ensures it is perfectly sharp, but the reflection may be slightly soft, creating a sense of separation and depth. Conversely, focusing a third of the way into the reflection (a variation of the hyperfocal distance technique) can yield an image that is acceptably sharp from front to back. The most artistic choice might be to embrace slight motion or defocus, turning the reflection into an abstract wash of colour and light—a truly painterly effect.
Key Takeaways
- Artistic control, not total glare elimination, is the goal for powerful reflection photography.
- The water’s surface is a dynamic canvas; use a CPL filter to choose between a mirror or a window.
- Intentionality is key: every choice of exposure, focus, and timing contributes to the final artistic statement.
Helicopter vs. Fixed Wing: Which Offers the Best Scenic Flight Over the Delta?
To truly comprehend the scale and intricate design of the Okavango Delta, you must see it from above. The winding channels, isolated islands, and vast floodplains form an abstract pattern that is only visible from the air. An aerial perspective offers a completely different way to photograph the Delta’s reflections, turning the landscape into a grand, graphic canvas. The choice between a helicopter and a fixed-wing aircraft, however, will fundamentally shape the images you can create.
A doors-off helicopter flight is the ultimate platform for photographic freedom. The ability to hover, rotate, and shoot straight down without glass distortion allows for incredible top-down abstract compositions. It is an intense experience, with extreme vibration and wind buffeting that demand very high shutter speeds. A fixed-wing flight is generally more affordable and provides sweeping, grand landscape views as you bank and turn over the Delta. While you are in constant forward motion, it’s an excellent way to capture the sheer scale of the ecosystem. An hour-long scenic helicopter flight over the Okavango Delta, for instance, is a significant investment, with costs around $325 per person, but the unique photographic potential can be well worth it.
Regardless of the platform, certain technical rules apply. Your shutter speed needs to be much higher than on the ground to counteract the vibration and motion. The « 8x focal length » rule is a good guideline: if you’re shooting with a 200mm lens, your shutter speed should be at least 1/1600s. Your most important tool, however, is communication with your pilot.
| Platform | Min Shutter Speed | Best For | Challenges |
|---|---|---|---|
| Helicopter Doors-Off | 1/2000s (rotor blur) | Top-down abstracts, hovering shots | Extreme vibration, wind buffeting |
| Fixed Wing | 1/1000s minimum | Grand landscapes, sweeping views | Constant forward motion, banking turns |
| Focal Length Rule | 8x your focal length | Sharp images (200mm = 1/1600s) | Higher ISO required |
Before takeoff, you must brief your pilot on your goals. Ask for steep banking turns in a fixed-wing plane for more dynamic angles, or request that your helicopter pilot hovers and rotates slowly over key features. To minimize reflections from the windows (if present), wear dark clothing and consider pressing your lens hood directly against the glass. An aerial view offers a god-like perspective on the Delta’s beauty, and choosing the right platform and technique is the key to capturing it.
Now that you are equipped with the principles of timing, the technical mastery of light, and the strategies for capturing subjects on and above the water, the final step is to synthesize this knowledge into a cohesive artistic vision. Begin by applying these concepts at the water’s edge, using your CPL not just as a filter, but as a creative tool to paint with reflection and transparency.